“Slate” Concrete Patio Makeover


The concrete slab on our back patio has definitely seen better days. It was in OK shape when we first moved in and the humid, damp weather we have doesn’t help it any as the years go by. Several contractors have told us that it looks like the slab was never poured correctly and that is why it has so many cracks in it. To fix it properly, it would all have to be jackhammered out and repoured. Since we want to redesign this space eventually when budget allows, we aren’t interested in spending very much to maintain the existing design. But it was getting depressing being out on the patio looking at this terrible, dirty-looking-even-when-it’s-clean, surface.

So, what to do? I took inspiration from the existing slate path leading up to the patio as well as a slate floorcloth project in one of Lisa Quinn’s books.

Off I went to the Home Depot to purchase paint. I found concrete garage floor paint that suited the job nicely. The paint came in just two colors, silver and slate gray, which was even more perfect because those were exactly the colors I needed. While there, I ran into a Home Depot employee who became the guardian angel of my painting project. He insisted that I purchase all of the preparation chemicals to make sure the paint finish would stick around once I was finished.
Step One: Stripping

The first step was to strip off the existing peeling surface. I assumed this was some sort of paint. The stripper is a seriously caustic chemical so make sure you wear gloves, protective clothing and eye protection. You also need good ventilation for the fumes. Since I was outside this wasn’t much of a concern. You also need to hose down with water any nearby lawn and landscaping to protect them from runoff. I brushed the stripper on with a synthetic broom and waited for about 20 minutes. Using an old putty knife, I then came back and tried to remove the surface.

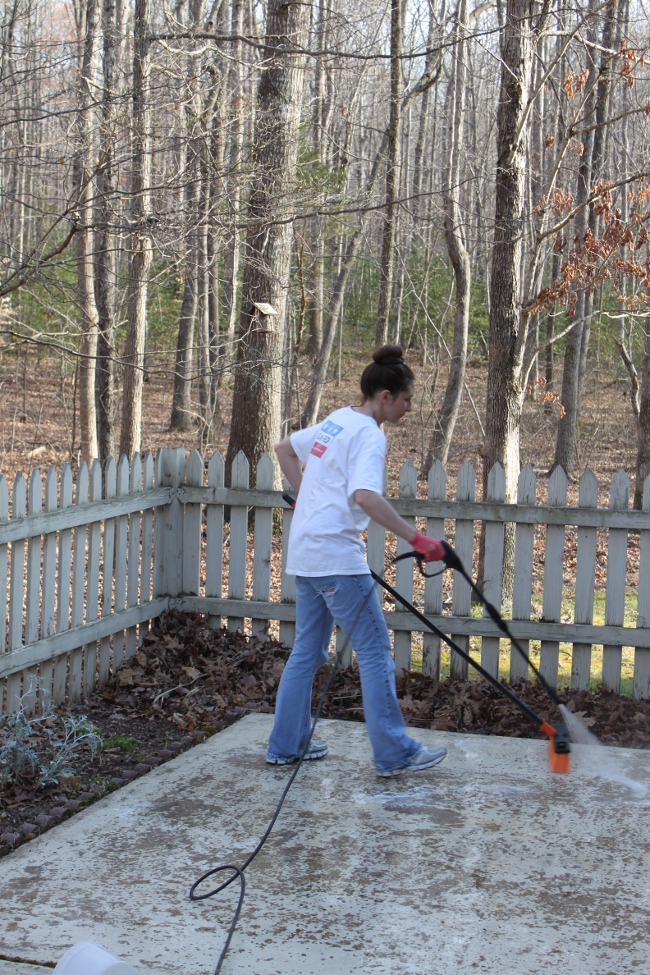
The surface was not coming off easily if at all. I could really scrape it and get a little off but it didn’t seem right somehow. I also knew that this part was going to take forever to finish. I tested several areas of the peeling finish and none of it was coming off with the stripper. So, I just pressure washed all the stripper off. After some research on the computer, my guess is that my peeling surface is not paint at all but probably a skim-coat of concrete! This patio’s problems must go way back.
The skim coat tells us that the patio surface could flake off at any time. Fortunately, slate is a sort of forgiving pattern that looks good with imperfections so we decided to proceed at this point with the project and hope that the new paint surface might help prevent further flaking and deterioration.
Step Two: Etching

The next step in the surface preparation is to “etch” the concrete. This step roughs up the surface so the paint will adhere better. The etching chemicals are strong so the same precautions with regard to protective clothing and hosing down landscaping apply. I diluted the etching chemical in a disposable bucket, poured it on the surface and brushed it around with the synthetic brush.

After it had penetrated for the appropriate amount of time, I washed it off using the pressure washer and a brush.

Step Three: Mask and Prime

In any painting project, there are always more surface preparation steps than actual painting. You can always tell when someone skips the surface prep because the paint isn’t as flawless, flat and smooth. At this point in the project, we were ready to paint and fortunately it was time! Primer went on next.
First, we rounded up all the leftover painters tape in the basement and masked off brick and other surfaces we didn’t want painted.

Finally, it was time to paint! We put a generous amount of primer down. I believe it took at least a gallon and a half for all of our patio. The easiest tool for this was a small spongy roller. It was the best at distributing a ton of paint and forcing the paint into the bumpy concrete surface.
While this project is not really kid-appropriate my children could not be stopped from helping. They found their own paint clothes and ended up doing an excellent job cutting in while I rolled the larger areas.


The primer goes on a watery white and dries clear so there is not much gratification that you have made a positive change to the surface at this point. You also have to completely let go of any perfectionist tendencies when painting outside. Inevitably, there will be dirt and dust blowing into your paint job. Even if you just washed the patio, the paint roller will get very dirty. Just remind yourself that no one will notice in the finished job and that it is supposed to look natural.
Step Four: Base Coat

Our base coat was a silver gray. Since epoxy paints can be very slippery when wet, we added a “Floor Finish Additive” to the paint to make it less slippery. (Note that the package says if you add the anti-slip agent it will reduce the lifespan of the paint, though!)


The paint helpers appeared again and we got to work.

The concrete was really absorbing the paint. I found it easiest to use a wide paintbrush to get the paint into all the cracks. This step took forever and I used all of 2 gallons of paint to cover the patio.

Finally, at the end of this step we begin to see some progress!

Now, if your concrete is in pretty good condition, you could always stop here. The base coat looks a bit like newly-poured concrete. In our case, however, you could still see through the base coat to all the imperfections in the surface beneath so we had more to do.
Step Five: “Slate” Finish

For the last step of the project I needed tape. I was aiming for a faux tile look so I wanted to use tape that was very narrow, similar to a 1/4″ grout. When I was at Home Depot, the same guy who helped me with the paint before just happened to be there. I explained to him the look I was going for and my disappointment that the tape selection available was 3/4″ at the narrowest. Rather than just tell me to make the best of it, he encouraged me to look for auto pin-striping tape that comes in narrower widths. He was really pushing me to make this project as good as it could be. (It is certainly one of the bright sides of the down economy that we now have excellent customer service.)
So, I went in search of narrow tape and found it in an unexpected place. . . the craft store! The most affordable option for my purpose was 1/4″ quilters tape. I am not exactly sure what quilters use this tape for but it comes in 1/4″ rolls with about 10 yards to a roll.
The next step was to tape off the patio. I was going for a “messy tile” type of look. I didn’t want the lines to be too perfect or it wouldn’t look real. So, I roughly taped things off into large tiles. You do need to measure and keep the tiles approximately even to make the effect work. You could be as detail-oriented as you want here. Since I had such a huge surface to cover, I opted for a simple look with larger tiles.


Once the pattern was down, I mixed up the slate gray paint with the non-slip additive and used a sponge to gently sponge it all over the patio. It was not necessary to be consistent or accurate with the sponging. It was just fine if some of the base coat showed through. I tried not to get the paint too wet near the tape lines so it wouldn’t bleed under the tape.

When the topcoat is dry, it is pretty easy to find a helper to take the tape off for you. This is probably the most fun part of the whole project.

You can even save on tape by re-using the masking tape for each section. Yes, it gets a little less sticky with each use but I re-used my lines about 3 times with no bad effects. Here you can see a finished section and a taped-out section awaiting painting.

This part took several days to complete working just a few hours at a time. You probably could finish it all in one day if you really pushed and bought more masking tape.

Finished Results!

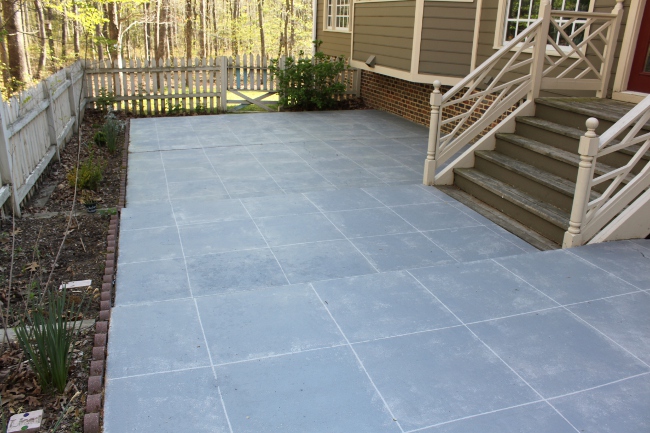
The finished patio is a pretty good trompe l’oeil (“fool the eye”) effect if I do say so myself. No, it’s not perfect but it is so much better than it was!


And for a few before and after comparison shots:
 |
 |
 |
 |
 |
 |
Overall, I am really pleased with how this came out! While it was a little time consuming due to the area to be covered, it wasn’t that difficult to achieve. My only wish is that the paint also came in a brown tint so that I could have double-sponged the top coat for an even more convincing look. I also need to paint the fence, as you can see!
Overall, the cost for materials for this makeover was about $250, not including brushes, pressure washer, etc. and other materials and tools we had already. It was about $0.50/square foot, far cheaper than using actual slate tiles or repouring concrete. It remains to be seen how the paint will hold up with the weather but so far so good. We also have a little bit of the materials left over to do our garage floor, which my husband is really looking forward to! This would be a great Father’s Day surprise makeover project.

What do you think of this makeover? Would you be willing to try something like this? Please share in the comments.
P.S. I have no affiliation with Home Depot, Behr paints or any other product shown here.
